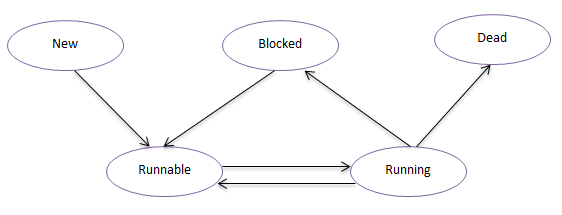
线程的状态 Java中线程的状态可分为五种:New(新建状态),Runnable(就绪状态),Running(运行状态),Blocked(阻塞状态),Dead(死亡状态)。
New:新建状态,当线程创建完成时为新建状态,即new Thread(…),还没有调用start方法时,线程处于新建状态。
Runnable:就绪状态,当调用线程的的start方法后,线程进入就绪状态,等待CPU资源。处于就绪状态的线程由Java运行时系统的线程调度程序(thread scheduler)来调度。
Running:运行状态,就绪状态的线程获取到CPU执行权以后进入运行状态,开始执行run方法。
Blocked:阻塞状态,线程没有执行完,由于某种原因(如,I/O操作等)让出CPU执行权,自身进入阻塞状态。
Dead:死亡状态,线程执行完成或者执行过程中出现异常,线程就会进入死亡状态。
wait/notify/notifyAll方法的使用 wait方法 JDK中一共提供了这三个版本的方法,
wait()方法的作用是将当前运行的线程挂起(即让其进入阻塞状态),直到notify或notifyAll方法来唤醒线程
wait(long timeout),该方法与wait()方法类似,唯一的区别就是在指定时间内,如果没有notify或notifAll方法的唤醒,也会自动唤醒
至于wait(long timeout,long nanos),本意在于更精确的控制调度时间,不过从目前版本来看,该方法貌似没有完整的实现该功能
通过一个简单的例子来演示wait()方法的使用
1
2
3
4
5
6
7
8
9
10
11
12
13
14
15
16
17
18
19
20
21
public class WaitTest public void testWait () System.out.println("Start-----" ); try { wait(1000 ); } catch (InterruptedException e) { e.printStackTrace(); } System.out.println("End-------" ); } public static void main (String[] args) final WaitTest test = new WaitTest(); new Thread(new Runnable() { @Override public void run () test.testWait(); } }).start(); } }
这段代码的意图很简单,就是程序执行以后,让其暂停一秒,然后再执行。运行上述代码,查看结果:
1
2
3
4
5
6
Start----- Exception in thread "Thread-0" java.lang.IllegalMonitorStateException at java.lang.Object.wait(Native Method) at com.zhx2020.concurrent.help.WaitTest01.testWait(WaitTest01.java:11) at com.zhx2020.concurrent.help.WaitTest01$1.run(WaitTest01.java:23) at java.lang.Thread.run(Thread.java:748)
这段程序并没有按我们的预期输出相应结果,而是抛出了一个异常。大家可能会觉得奇怪为什么会抛出异常?而抛出的IllegalMonitorStateException异常又是什么?我们可以看一下JDK中对IllegalMonitorStateException的描述:
1 Thrown to indicate that a thread has attempted to wait on an object's monitor or to notify other threads waiting on an object's monitor without owning the specified monitor.
这句话的意思大概就是:线程试图等待对象的监视器或者试图通知其他正在等待对象监视器的线程,但本身没有对应的监视器的所有权。其实这个问题在《Synchronized详解》一文中有提到过,wait方法是一个本地方法,其底层是通过一个叫做监视器锁的对象来完成的。所以上面之所以会抛出异常,是因为在调用wait方式时没有获取到monitor对象的所有权,那如何获取monitor对象所有权?Java中只能通过Synchronized关键字来完成,修改上述代码,增加Synchronized关键字:
1
2
3
4
5
6
7
8
9
10
11
12
13
14
15
16
17
18
19
20
21
public class WaitTest02 public synchronized void testWait () System.out.println("Start-----" ); try { wait(1000 ); } catch (InterruptedException e) { e.printStackTrace(); } System.out.println("End-------" ); } public static void main (String[] args) final WaitTest02 test = new WaitTest02(); new Thread(new Runnable() { @Override public void run () test.testWait(); } }).start(); } }
现在再运行上述代码,就能看到预期的效果了:
所以,通过这个例子,大家应该很清楚,wait方法的使用必须在同步的范围内,否则就会抛出IllegalMonitorStateException异常,wait方法的作用就是阻塞当前线程等待notify/notifyAll方法的唤醒,或等待超时后自动唤醒。
notify/notifyAll方法 有了对wait方法原理的理解,notify方法和notifyAll方法就很容易理解了。既然wait方式是通过对象的monitor对象来实现的,所以只要在同一对象上去调用notify/notifyAll方法,就可以唤醒对应对象monitor上等待的线程了。notify和notifyAll的区别在于前者只能唤醒monitor上的一个线程,对其他线程没有影响,而notifyAll则唤醒所有的线程,看下面的例子很容易理解这两者的差别:
1 2 3 4 5 6 7 8 9 10 11 12 13 14 15 16 17 18 19 20 21 22 23 24 25 26 27 28 29 30 31 32 33 public class NotifyTest public synchronized void testWait () System.out.println(Thread.currentThread().getName() + " Start-----" ); try { wait(0 ); } catch (InterruptedException e) { e.printStackTrace(); } System.out.println(Thread.currentThread().getName() + " End-------" ); } public static void main (String[] args) throws InterruptedException final NotifyTest test = new NotifyTest(); for (int i = 0 ; i < 5 ; i++) { new Thread(new Runnable() { @Override public void run () test.testWait(); } }).start(); } synchronized (test) { test.notify(); } Thread.sleep(3000 ); System.out.println("-----------分割线-------------" ); synchronized (test) { test.notifyAll(); } } }
运行结果
1 2 3 4 5 6 7 8 9 10 11 Thread-0 Start----- Thread-1 Start----- Thread-2 Start----- Thread-3 Start----- Thread-4 Start----- Thread-0 End------- -----------分割线------------- Thread-4 End------- Thread-3 End------- Thread-2 End------- Thread-1 End-------
从结果可以看出:调用notify方法时只有线程Thread-0被唤醒,但是调用notifyAll时,所有的线程都被唤醒了。
最后,有两点需要注意:
调用wait方法后,线程是会释放对monitor对象的所有权的
一个通过wait方法阻塞的线程,必须同时满足以下两个条件才能被真正执行:
线程需要被唤醒(超时唤醒或调用notify/notifyll)
线程唤醒后需要竞争到锁(monitor)
sleep/yield/join方法 sleep方法 sleep方法的作用是让当前线程暂停指定的时间(毫秒),sleep方法是最简单的方法,在上述的例子中也用到过,比较容易理解。唯一需要注意的是其与wait方法的区别。最简单的区别是,wait方法依赖于同步,而sleep方法可以直接调用。而更深层次的区别在于sleep方法只是暂时让出CPU的执行权,并不释放锁。而wait方法则需要释放锁。
1 2 3 4 5 6 7 8 9 10 11 12 13 14 15 16 17 18 19 20 21 22 23 24 25 26 27 28 29 30 31 32 33 34 35 36 37 38 39 40 41 42 43 44 45 46 47 48 49 50 51 52 53 54 55 56 public class SleepTest public synchronized void sleepMethod () System.out.println("Sleep start-----" ); try { Thread.sleep(1000 ); } catch (InterruptedException e) { e.printStackTrace(); } System.out.println("Sleep end-----" ); } public synchronized void waitMethod () System.out.println("Wait start-----" ); synchronized (this ) { try { wait(1000 ); } catch (InterruptedException e) { e.printStackTrace(); } } System.out.println("Wait end-----" ); } public static void main (String[] args) final SleepTest test01 = new SleepTest(); for (int i = 0 ; i < 3 ; i++) { new Thread(new Runnable() { @Override public void run () test01.sleepMethod(); } }).start(); } try { Thread.sleep(10000 ); } catch (InterruptedException e) { e.printStackTrace(); } System.out.println("-----分割线-----" ); final SleepTest test02 = new SleepTest(); for (int i = 0 ; i < 3 ; i++) { new Thread(new Runnable() { @Override public void run () test02.waitMethod(); } }).start(); } } }
运行结果
1 2 3 4 5 6 7 8 9 10 11 12 13 Sleep start----- Sleep end----- Sleep start----- Sleep end----- Sleep start----- Sleep end----- -----分割线----- Wait start----- Wait start----- Wait start----- Wait end----- Wait end----- Wait end-----
这个结果的区别很明显,通过sleep方法实现的暂停,程序是顺序进入同步块的,只有当上一个线程执行完成的时候,下一个线程才能进入同步方法,sleep暂停期间一直持有monitor对象锁,其他线程是不能进入的。而wait方法则不同,当调用wait方法后,当前线程会释放持有的monitor对象锁,因此,其他线程还可以进入到同步方法,线程被唤醒后,需要竞争锁,获取到锁之后再继续执行。
yield方法 yield方法的作用是暂停当前线程,以便其他线程有机会执行,不过不能指定暂停的时间,并且也不能保证当前线程马上停止。yield方法只是将Running状态转变为Runnable状态。
1 2 3 4 5 6 7 8 9 10 11 12 13 14 15 16 17 18 19 20 21 22 public class YieldTest implements Runnable @Override public void run () try { Thread.sleep(100 ); } catch (InterruptedException e) { e.printStackTrace(); } for (int i = 0 ; i < 5 ; i++) { System.out.println(Thread.currentThread().getName() + ": " + i); Thread.yield(); } } public static void main (String[] args) YieldTest test = new YieldTest(); Thread t1 = new Thread(test, "FirstThread" ); Thread t2 = new Thread(test, "SecondThread" ); t1.start(); t2.start(); } }
运行结果
1 2 3 4 5 6 7 8 9 10 FirstThread: 0 SecondThread: 0 FirstThread: 1 SecondThread: 1 FirstThread: 2 SecondThread: 2 FirstThread: 3 SecondThread: 3 FirstThread: 4 SecondThread: 4
这个例子就是通过yield方法来实现两个线程的交替执行。不过请注意:这种交替并不一定能得到保证,源码中也对这个问题进行说明:
1 2 3 4 5 6 7 8 9 10 11 12 13 14 15 16 17 /** * A hint to the scheduler that the current thread is willing to yield * its current use of a processor. The scheduler is free to ignore this * hint. * * <p> Yield is a heuristic attempt to improve relative progression * between threads that would otherwise over-utilise a CPU. Its use * should be combined with detailed profiling and benchmarking to * ensure that it actually has the desired effect. * * <p> It is rarely appropriate to use this method. It may be useful * for debugging or testing purposes, where it may help to reproduce * bugs due to race conditions. It may also be useful when designing * concurrency control constructs such as the ones in the * {@link java.util.concurrent.locks} package. */
这段话主要说明了三个问题:
调度器可能会忽略该方法。
使用的时候要仔细分析和测试,确保能达到预期的效果。
很少有场景要用到该方法,主要使用的地方是调试和测试。
join方法 join方法的作用是父线程等待子线程执行完成后再执行,换句话说就是将异步执行的线程合并为同步的线程。JDK中提供三个版本的join方法,其实现与wait方法类似,join()方法实际上执行的join(0),而join(long millis, int nanos)也与wait(long millis, int nanos)的实现方式一致,暂时对纳秒的支持也是不完整的。
不使用join方法
1 2 3 4 5 6 7 8 9 10 11 12 13 14 15 16 17 18 19 20 21 public class JoinTest01 implements Runnable @Override public void run () try { System.out.println(Thread.currentThread().getName() + " start-----" ); Thread.sleep(1000 ); System.out.println(Thread.currentThread().getName() + " end------" ); } catch (InterruptedException e) { e.printStackTrace(); } } public static void main (String[] args) for (int i = 0 ; i < 5 ; i++) { Thread thread = new Thread(new JoinTest01()); thread.start(); } System.out.println("Finished~~~" ); } }
运行结果
1 2 3 4 5 6 7 8 9 10 11 Finished~~~ Thread-0 start----- Thread-1 start----- Thread-2 start----- Thread-3 start----- Thread-4 start----- Thread-0 end------ Thread-2 end------ Thread-1 end------ Thread-3 end------ Thread-4 end------
使用join方法
1 2 3 4 5 6 7 8 9 10 11 12 13 14 15 16 17 18 19 20 21 22 23 24 25 26 public class JoinTest02 implements Runnable @Override public void run () try { System.out.println(Thread.currentThread().getName() + " start-----" ); Thread.sleep(1000 ); System.out.println(Thread.currentThread().getName() + " end------" ); } catch (InterruptedException e) { e.printStackTrace(); } } public static void main (String[] args) for (int i = 0 ; i < 5 ; i++) { Thread thread = new Thread(new JoinTest02()); thread.start(); try { thread.join(); } catch (InterruptedException e) { e.printStackTrace(); } } System.out.println("Finished~~~" ); } }
运行结果
1 2 3 4 5 6 7 8 9 10 11 Thread-0 start----- Thread-0 end------ Thread-1 start----- Thread-1 end------ Thread-2 start----- Thread-2 end------ Thread-3 start----- Thread-3 end------ Thread-4 start----- Thread-4 end------ Finished~~~
对比两段代码的执行结果很容易发现,在没有使用join方法之间,线程是并发执行的,而使用join方法后,所有线程是顺序执行的。
参考